
Cheesecake, a dessert with roots in ancient Greece, was once a luxury for royalty. Over centuries it traveled through Europe, gaining richer textures and flavors. Today, the humble jar lets us enjoy that legacy in a health‑focused, high‑protein format—no need for lavish tables, just a quiet moment at your desk.
Why You'll Love It
-
- Packed with whey and Greek yogurt for a muscle‑friendly boost
-
- No baking required, so it’s ready in minutes
-
- Portable jars keep the dessert fresh and mess‑free
-
- Subtle sweetness lets you enjoy without guilt
"These jars are my go‑to snack—creamy, protein‑packed, and look so cute on my pantry shelf!"
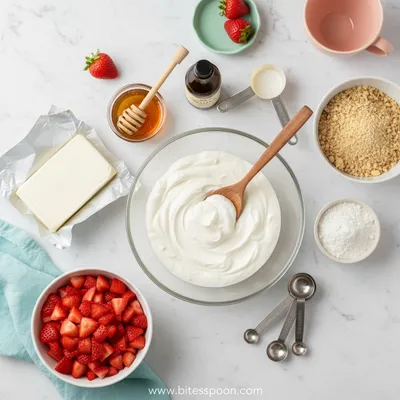
Essential Ingredient Guide
- Greek yogurt: Choose full‑fat for creaminess; it also adds extra protein and a tangy balance.
- Whey protein powder: Vanilla or unflavored works best; it blends smoothly and lifts the protein count.
- Cream cheese: Use a softened block; it creates that classic velvety mouthfeel.
- Honey or maple syrup: Just a drizzle for natural sweetness; you can trim it down if you prefer less sugar.
- Lemon zest: A tiny pinch adds brightness and cuts through the richness.
- Crushed graham or almond crumbs: Provides a subtle crunch and a base that echoes traditional crusts.
 Snacks, Appetizers & Fun Bites
Fruit Dip Recipe – Quick & Easy Snack
Quick, easy, and irresistibly tasty fruit dip for snacks or parties.
Complete Cooking Process
-
Ingredient Readiness:
Soften cream cheese, measure protein powder, and zest the lemon before you begin; this keeps the mixing smooth.
-
Flavor Development:
Blend yogurt, cream cheese, and sweetener until airy; the gentle whisk releases a faint, comforting aroma.
-
Texture Control:
Fold in protein powder slowly to avoid lumps; the mixture should be thick yet pourable into jars.
-
Finishing Touches:
Top each jar with a sprinkle of crumbs and a hint of zest, then refrigerate to set.
-
Serving Timing:
After at least two hours chilled, the jars are ready for a cool bite that feels indulgent.
-
Use a hand‑mixer on low speed; over‑mixing can make the texture grainy.
-
Chill the mixing bowl for extra firmness.
-
Add a pinch of sea salt to deepen the sweetness.
-
Pair with fresh berries for a burst of acidity.
Pro Tips
I’ve found that letting the jars sit longer, even overnight, lets the flavors meld nicely. The scent of vanilla and lemon becomes a gentle whisper when you open the lid. So, take your time, let it rest, and enjoy the calm it brings to your day.
 Snacks, Appetizers & Fun Bites
Quick Cucumber Mozzarella Salad
A quick, crisp cucumber and mozzarella salad with a hint of sweet vinaigrette.
The essence of the dish:
A silky blend of Greek yogurt, cream cheese, and vanilla whey, punctuated by a light lemon note and a whisper of sweet honey, all layered over a crumbly nutty base.
A fun fact or historical angle:
The earliest known cheese desserts were made by the Greeks, who mixed cheese with honey. Today we echo that tradition, adding modern protein power.
Flavor or sensory focus:
The first spoonful is cool and creamy, the lemon zest lifts the palate, and the crumbly topping offers a subtle, buttery crunch.
You Must Know
-
Keep the jars sealed; the texture stays perfect.
-
Serve chilled for the best mouthfeel.
-
Adjust sweetness to personal taste.
Frequently Asked Questions
→ Can I use flavored whey protein?
Yes, a flavored whey works, but it will change the overall taste profile; vanilla keeps it classic.
→ How long can the jars be stored?
Keep them refrigerated; they stay fresh for up to 4 days.
→ Is it possible to make a dairy‑free version?
Swap Greek yogurt for coconut yogurt and use a plant‑based cream cheese alternative.
→ What topping variations work well?
Fresh berries, chopped nuts, or a drizzle of dark chocolate all add texture and flavor.
→ Do I need to bake the crust?
No baking required; simply press the crumbs into the bottom of the jar.
→ Can I add fruit puree inside?
Absolutely—layer a thin swirl of fruit puree for extra brightness.
Nutrition Facts
per serving
290
Calories
22g
Protein
20g
Carbs
16g
Fat
Taste Profile
Creamy with a gentle honey‑lemon balance
Ingredient Substitutions
Don't have an ingredient? Try these alternatives
Will add a tropical flavor; adjust sweetener accordingly.
Leaves a slightly earthier taste; use vanilla flavored for best results.
Recipe Variations
Try these delicious twists on the original
Chocolate Swirl
Add 2 tbsp cocoa powder to the filling and top with chocolate‑protein smores bowl crumbs.
Berry Bliss
Layer a spoonful of strawberry‑cheesecake‑overnight‑oats between the crust and filling.
Common Mistakes to Avoid
Learn from others' mistakes for perfect results
- Over‑mixing the filling, which can make it grainy.
- Adding too much honey, leading to an overly sweet jar.
- Skipping the chill step for the crust, causing a soggy base.
Meal Prep & Storage
Make Ahead Tips
You can assemble the jars up to two days ahead; just keep the topping separate until serving.
Leftover Ideas
Enjoy a second serving straight from the fridge or let it soften at room temperature for 10 minutes before digging in again.
Perfect Pairings
Serve this with...
Cooking Timeline
Prepare base: mix flour, butter, honey, and press into jars.
Beat cream cheese, then blend in yogurt, protein powder, zest, and salt.
Layer filling over crust, smooth tops.
Seal jars and refrigerate.
Allow flavors to meld; add toppings before serving.
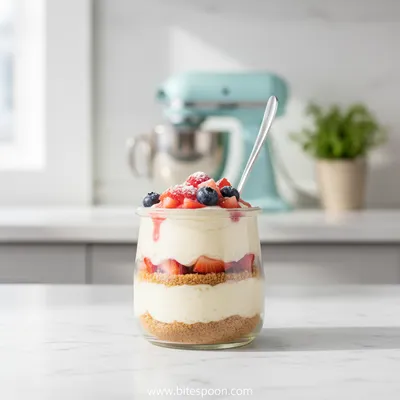
High Protein Cheesecake Jars
Creamy, portable high‑protein cheesecake jars that feel like a little indulgence while keeping you fueled for the day.
Timing
Prep Time
15 Minutes
Cook Time
0 Minutes
Total Time
15 Minutes
Recipe Details
Ingredients
Base
-
01
1/2 cup almond flour
-
02
2 tbsp melted butter
-
03
1 tbsp honey
-
04
1 tbsp crushed graham crumbs
Filling
-
01
1 cup Greek yogurt (full‑fat)
-
02
8 oz cream cheese, softened
-
03
1/2 cup vanilla whey protein powder
-
04
2 tbsp honey or maple syrup
-
05
Zest of 1 lemon
-
06
Pinch of sea salt
Optional Topping
-
01
Fresh berries
-
02
Chopped almonds
-
03
A drizzle of melted dark chocolate
Instructions
Combine almond flour, melted butter, honey, and crushed graham crumbs in a small bowl; press the mixture into the bottom of four 8‑oz jars.
In a larger bowl, beat the softened cream cheese until smooth, then add Greek yogurt and continue mixing until airy.
Add vanilla whey protein powder, honey, lemon zest, and a pinch of sea salt; fold gently until fully incorporated and the mixture is thick.
Spoon the cheesecake filling over the crust in each jar, smoothing the top with a spatula.
Refrigerate the jars for at least 2 hours, or overnight for deeper flavor.
Before serving, add your chosen topping—fresh berries, chopped almonds, or a thin chocolate drizzle.
Notes & Tips
-
1
If the mixture feels too thick, add a splash of milk or almond milk.
-
2
For extra stability, chill the crust for 10 minutes before adding filling.
-
3
Taste and adjust sweetness before sealing the jars.
 Snacks, Appetizers & Fun Bites
Winter Fruit Salad With Lime Dressing
Seasonal winter fruits with a zingy lime vinaigrette.
Tools You'll Need
-
8‑oz mason jars with lids
-
Mixing bowls
-
Hand mixer or whisk
-
Spatula
-
Measuring cups and spoons
Must-Know Tips
-
Don't over‑mix the filling; gentle folding keeps it smooth.
-
Let the crust set in the fridge before adding filling to avoid sogginess.
-
Taste the sweetener level before sealing; you can always add more later.
Professional Secrets
-
Room‑temperature cream cheese blends more evenly, preventing lumps.
-
Using a chilled bowl helps the filling hold its shape longer.
-
A light press on the crust creates an even base that supports the filling.

Recipe by
Mia CollinsSmall bites, big happiness 😋✨ Fun snacks, tasty treats, and flavor in every bite 🧆
Get Delicious Recipes Weekly
Join 25,000+ home cooks getting our best recipes straight to their inbox.
Free forever • No spam • Unsubscribe anytime