Granola bars trace back to the early 20th‑century health movements, when teachers and nutritionists sought easy, nutritious foods for students. The concept of pressed oat clusters emerged in the 1960s as a convenient energy source for hikers. Over decades, the bars have evolved from rugged trail food to a beloved kitchen staple, celebrated for their versatility and ease. Today, they capture that same wholesome spirit while fitting snugly into modern, busy lives.
Why You'll Love It
-
- No oven needed, perfect for summer kitchens
-
- Simple ingredients you likely have on hand
-
- Customizable with nuts, dried fruit, or chocolate
-
- Keeps well, great for on‑the‑go families
"These bars are my go‑to office snack – sweet, crunchy, and never melt in my bag!"
Essential Ingredient Guide
- Old‑fashioned rolled oats: Provides the sturdy base; toast lightly for extra nuttiness
- Mixed nuts and seeds: Adds crunch and healthy fats; chop roughly for texture
- Honey: Natural sweetener that binds the bars; you can swap with maple syrup
- Nut butter: Creates richness and helps the mixture stick together
- Dried fruit: Adds chewy bursts of flavor; keep them small to distribute evenly
- Dark chocolate chips: Optional indulgence; melt and drizzle for a glossy finish
 Snacks, Appetizers & Fun Bites
Quick Cucumber Mozzarella Salad
A quick, crisp cucumber and mozzarella salad with a hint of sweet vinaigrette.
Complete Cooking Process
-
Ingredient Readiness:
Measure and lightly toast the oats and nuts, then let them cool before mixing.
-
Flavor Development:
Warm honey, butter, and nut butter together until smooth; this melds the sweet and nutty notes.
-
Texture Control:
Stir in dried fruit and chocolate chips after the mixture cools slightly to keep them from melting.
-
Finishing Touches:
Press the mixture firmly into a lined pan, drizzle with extra chocolate if desired, and chill.
-
Serving Timing:
Slice once set; serve at room temperature or chilled for a firmer bite.
-
Press the mixture with parchment paper to avoid sticking
-
Freeze for 20 minutes before cutting for clean edges
-
Store in an airtight container with a paper towel to absorb moisture
-
Swap honey for agave if you need a vegan version
Pro Tips
I’ve found that letting the bars rest, even just a short while, lets the flavors settle and the texture firm up. It feels like a tiny act of patience that rewards you with a bar that holds together nicely, without crumbling into the pan. Take a moment, then enjoy each bite as a gentle reminder that good things often need a little pause.
 Snacks, Appetizers & Fun Bites
Winter Fruit Salad With Lime Dressing
Seasonal winter fruits with a zingy lime vinaigrette.
The essence of the dish:
A harmonious blend of toasted oats, crunchy nuts, and sweet honey, bound together with buttery richness.
A fun fact or historical angle:
During the 1970s, hikers would carry homemade oat bars as high‑energy trail snacks, long before the commercial versions appeared.
Flavor or sensory focus:
You’ll notice the warm, toasted aroma of oats, the subtle snap of nuts, and a lingering honey‑kissed sweetness.
You Must Know
-
Oats must be slightly toasted for depth
-
Honey should be warmed but not boiled
-
Press firmly to avoid crumbly bars
Frequently Asked Questions
→ Can I make these gluten‑free?
Yes, substitute rolled oats with certified gluten‑free oats and ensure all add‑ins are gluten‑free.
→ How long will the bars stay fresh?
Stored in an airtight container at room temperature they keep for up to 5 days; refrigerate for a week.
→ Can I add protein powder?
Absolutely – mix a scoop of your favorite vanilla or unflavored protein powder into the wet ingredients.
→ What’s a good dairy‑free butter substitute?
Use coconut oil or a plant‑based butter spread; it will still give a pleasant richness.
→ How do I keep the bars from sticking to the pan?
Line the pan with parchment paper and press the mixture through the paper for easy removal.
→ Can I make these bars sweet without honey?
Maple syrup or agave nectar work well; just maintain the same liquid ratio.
Nutrition Facts
per serving
210
Calories
5g
Protein
26g
Carbs
9g
Fat
Taste Profile
Sweet, nutty, with a hint of caramelized honey
Ingredient Substitutions
Don't have an ingredient? Try these alternatives
Use the same amount; flavor will be milder.
Adds a subtle coconut aroma, keep the same quantity.
Recipe Variations
Try these delicious twists on the original
Spicy Version
Add 1 tsp chili powder and a pinch of cayenne for heat.
Mediterranean Style
Mix in chopped pistachios, dried apricots, and a drizzle of honey‑orange glaze.
Common Mistakes to Avoid
Learn from others' mistakes for perfect results
- Over‑heating honey, which can turn bitter.
- Pressing the mixture too lightly, leading to crumbly bars.
- Skipping the cooling step, causing bars to break when sliced.
Meal Prep & Storage
Make Ahead Tips
You can prepare the mixture and press it into the pan up to 24 hours ahead; keep covered and refrigerate.
Leftover Ideas
Reheat gently in a skillet with a splash of milk for a warm, soft bite.
Perfect Pairings
Serve this with...
Cooking Timeline
Toast oats and nuts; prep dried fruit.
Melt honey, butter, and nut butter together.
Combine wet and dry ingredients; stir to coat.
Press into pan, chill until firm.
Slice bars and store.
 Snacks, Appetizers & Fun Bites
Frozen Yogurt Granola Cups
Crisp granola shells cradling cool, creamy frozen yogurt for a wholesome snack.

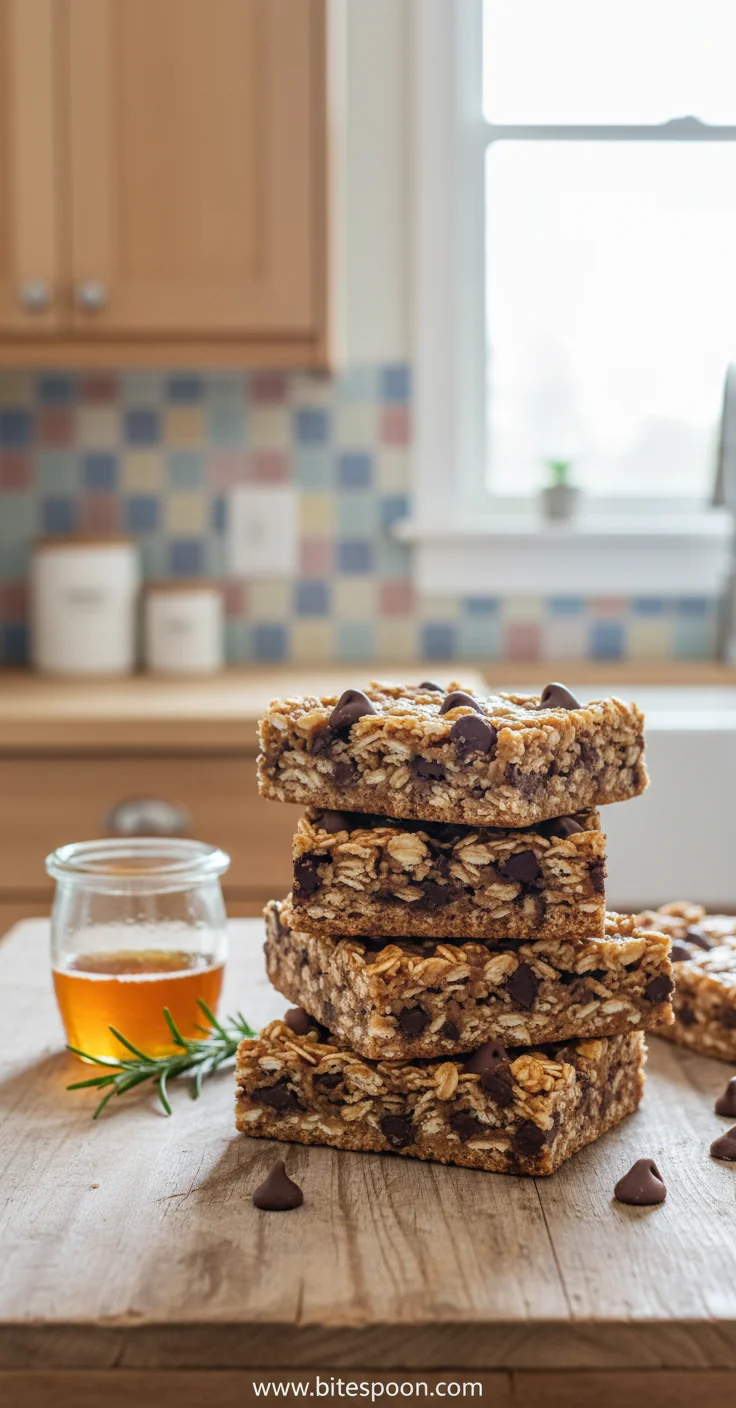
Homemade No Bake Granola Bars
Quick, no‑bake granola bars that are crunchy, sweet, and perfect for a snack on the go. Made with wholesome oats, nuts, and a touch of honey, these bars stay soft and flavorful without ever touching the oven.
Timing
Prep Time
10 Minutes
Cook Time
0 Minutes
Total Time
20 Minutes
Recipe Details
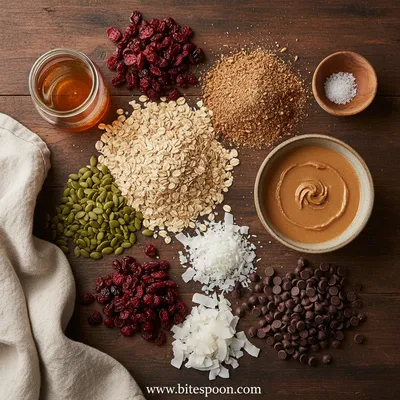
Ingredients
Main Ingredients
-
01
3 cups old‑fashioned rolled oats
-
02
1 cup mixed nuts and seeds, roughly chopped
-
03
1/2 cup dried cranberries or raisins
-
04
1/4 cup dark chocolate chips (optional)
-
05
1/3 cup honey
-
06
1/4 cup unsalted butter or coconut oil
-
07
2 tbsp natural almond or peanut butter
Instructions
Preheat a dry skillet over medium heat and toast the oats and nuts for 3‑4 minutes, stirring often, until they turn a light golden and release a nutty scent.
In a small saucepan, melt the butter (or coconut oil), honey, and almond butter together over low heat, stirring until smooth and glossy.
Remove the pan from heat and fold in the toasted oats, nuts, dried fruit, and chocolate chips if using. Mix gently until everything is evenly coated.
Transfer the mixture to a lined 8×8‑inch pan. Press down firmly with a piece of parchment paper or the back of a spoon to create an even, compact layer.
Place the pan in the refrigerator for at least 20 minutes, or until the bars are firm enough to cut.
Lift the set mixture out of the pan using the parchment overhang, slice into 12 bars, and store in an airtight container.
Notes & Tips
-
1
If the mixture feels too dry, add a tablespoon of warm honey to help it bind.
-
2
For a richer flavor, toast the nuts on low heat for an extra minute before mixing.
-
3
These bars can be wrapped individually for convenient grab‑and‑go snacks.
Tools You'll Need
-
Large skillet
-
Medium saucepan
-
Wooden spoon
-
8×8‑inch baking pan
-
Parchment paper
-
Measuring cups and spoons
-
Sharp knife
Must-Know Tips
-
Do not over‑heat the honey, it can become bitter.
-
Press the mixture while warm for the best compactness.
-
Cool the pan before slicing to avoid crumbling.
Professional Secrets
-
Use a kitchen scale for precise oat measurements.
-
Add a pinch of sea salt to amplify sweetness.
-
Press with a flat spatula wrapped in parchment for an even surface.

Recipe by
Mia CollinsSmall bites, big happiness 😋✨ Fun snacks, tasty treats, and flavor in every bite 🧆
Get Delicious Recipes Weekly
Join 25,000+ home cooks getting our best recipes straight to their inbox.
Free forever • No spam • Unsubscribe anytime