Brownies originated in the United States at the end of the 19th century, emerging from a desire for a cake that could be cooked quickly in a pan. Over decades, bakers have experimented, adding layers, fillings, and toppings. The modern layered chocolate mousse brownie blends that historic fudgy base with a mousse inspired by classic French desserts, creating a bridge between humble pantry treats and refined patisserie.
Why You'll Love It
-
- The brownie base stays soft and fudgy all the way through.
-
- A light mousse adds a silky contrast without being overly sweet.
-
- Easy to make ahead, so you can enjoy it fresh or chilled.
-
- Beautiful layered look that feels extra special for any gathering.
"These brownies are the perfect balance of dense and airy—my family can’t get enough!"
Essential Ingredient Guide
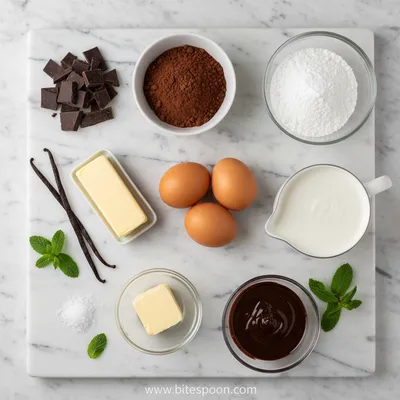
- Dark chocolate: Choose a good quality 70% dark chocolate; it gives depth and a slight bitterness that balances the sweetness.
- Unsalted butter: Room‑temperature butter mixes evenly, creating a glossy brownie crust.
- Greek yogurt: Adds tang and lightness to the mousse, keeping it fluffy.
- Cocoa powder: Use Dutch‑process for a richer color and smoother flavor.
- Lemon zest: A pinch of zest lifts the chocolate, giving a subtle bright note.
- Maple syrup: Provides gentle sweetness and a hint of caramel aroma.
Complete Cooking Process
-
Ingredient Readiness:
Gather all chocolate, butter, sugar, and dairy ingredients; melt chocolate and butter together, then let cool slightly before folding in eggs.
-
Flavor Development:
The mousse gains its airy texture when whipped with chilled Greek yogurt and a dash of lemon zest.
-
Texture Control:
Bake the brownie layer just until the edges set; this keeps the centre tender.
-
Finishing Touches:
Spread the mousse over the warm brownie, then chill to set the layers.
-
Serving Timing:
Allow the brownies to sit at room temperature for about 10 minutes before slicing for the best texture.
-
Use a light hand when folding mousse to keep it airy.
-
Line the pan with parchment for clean removal.
-
Dust with a little cocoa powder just before serving for extra aroma.
-
Store in the fridge; they taste even better the next day.
Pro Tips
Well, these little secrets keep the brownies from getting too dense and the mousse from collapsing. I often let the pan sit uncovered for a moment after chilling; that tiny pause helps the top set nicely without a glossy film. So, yes, a bit of patience pays off.
The essence of the dish:
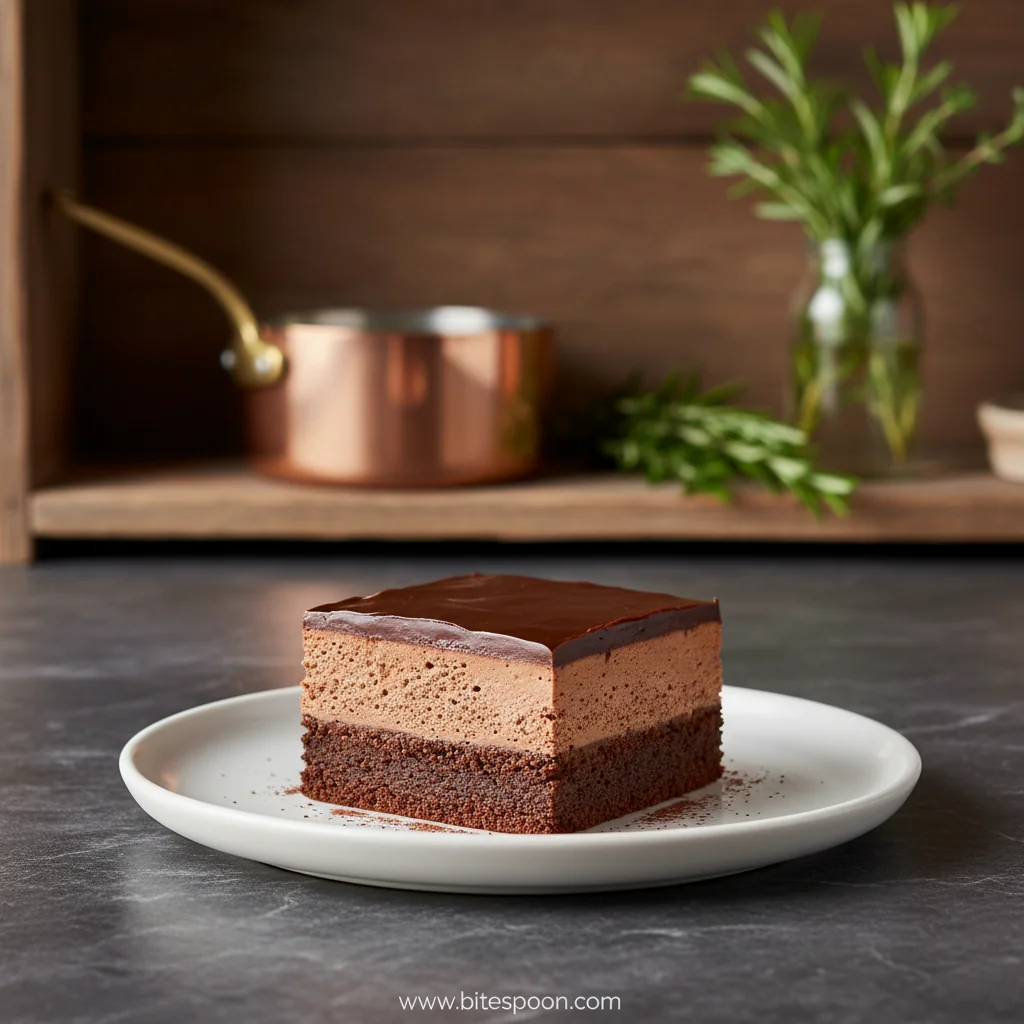
A fudgy, chocolate‑rich base meets a cloud‑like mousse. The contrast of dense and light creates a comforting bite that feels like a warm hug and a cool breeze at once.
A fun fact or historical angle:
The original brownie didn’t contain chocolate at all; early recipes used cocoa powder only. It wasn’t until the 1900s that melted chocolate became common, giving us the deep, dark brownie we love today.
Flavor or sensory focus:
The first fork encounters the buttery, slightly crisp edge, then slides into the soft, almost molten center, while the mousse adds a silky, slightly tangy finish.
You Must Know
-
Keep the mousse chilled while spreading.
-
Do not over‑bake the brownie base.
-
Use a sharp knife warmed in hot water for clean cuts.
Frequently Asked Questions
→ Can I make the mousse without Greek yogurt?
Yes, you can substitute with whipped cream or a plant‑based yogurt; just adjust the sweetness accordingly.
→ Do these brownies freeze well?
Absolutely. Wrap them tightly and freeze for up to two months; thaw in the fridge before serving.
→ What if I don’t have dark chocolate?
Semi‑sweet chocolate works, but the flavor will be a touch sweeter.
→ Can I add nuts or fruit?
Sure—chopped walnuts or a handful of raspberries folded into the brownie layer add texture.
→ How long can I keep them in the fridge?
They stay fresh for up to five days when stored in an airtight container.
→ Is this recipe gluten‑free?
Swap the all‑purpose flour for a 1‑to‑1 gluten‑free blend; the texture remains lovely.
Nutrition Facts
per serving
320
Calories
6g
Protein
30g
Carbs
18g
Fat
Taste Profile
Richly chocolatey with a balanced sweetness and a hint of citrus brightness.
Ingredient Substitutions
Don't have an ingredient? Try these alternatives
To keep the mousse light, ensure the substitute is well‑drained.
Use a 1‑to‑1 ratio; the texture remains tender.
Recipe Variations
Try these delicious twists on the original
Spicy Version
Add a pinch of cayenne and a drizzle of melted dark chocolate infused with chili for a subtle heat.
Mediterranean Style
Stir in chopped pistachios and a hint of orange zest into the mousse for a bright, nutty twist.
Common Mistakes to Avoid
Learn from others' mistakes for perfect results
- Over‑mixing the batter, which can make the brownies tough.
- Adding the mousse while the brownie is still hot, causing it to melt.
- Skipping the chilling step, which leads to a runny mousse layer.
Meal Prep & Storage
Make Ahead Tips
You can bake the brownie layer a day ahead, let it cool, and store covered; prepare the mousse just before serving and chill for at least an hour.
Leftover Ideas
Reheat gently in a microwave for 10‑15 seconds if you prefer them warm, or enjoy them straight from the fridge for a firmer texture.
Perfect Pairings
Serve this with...
Cooking Timeline
Gather and measure all ingredients; line the pan with parchment.
Melt butter and chocolate together, then whisk in sugar and eggs.
Fold in dry ingredients, spread batter, and place in the oven.
Bake brownies; while they bake, prepare the mousse.
Cool brownies slightly, spread mousse, and refrigerate to set.

Layered Chocolate Mousse Brownies
These layered chocolate mousse brownies are a gentle hug of fudgy brownie base topped with airy mousse—soft, sweet, and just the right kind of indulgent. I remember when I first tried something similar, it felt like a fudgy brownies dream turned into a mousse wonder.
Timing
Prep Time
20 Minutes
Cook Time
30 Minutes
Total Time
50 Minutes
Recipe Details
Ingredients
Brownie Base
-
01
1/2 cup (115g) unsalted butter
-
02
8 oz (225g) dark chocolate, chopped
-
03
3/4 cup (150g) granulated sugar
-
04
2 large eggs
-
05
1 tsp vanilla extract
-
06
3/4 cup (95g) all‑purpose flour
-
07
1/4 cup (25g) cocoa powder
-
08
1 pinch salt
Chocolate Mousse
-
01
1 cup (240g) Greek yogurt
-
02
4 oz (115g) dark chocolate, melted and cooled
-
03
2 tbsp maple syrup
-
04
1 tsp lemon zest
-
05
1 tbsp cocoa powder for dusting
Instructions
Preheat the oven to 350°F (175°C). Line a 9‑inch square pan with parchment; this helps the brownies release cleanly.
Melt butter and chocolate together in a gentle heat, stir until smooth, then let cool for a few minutes.
Whisk sugar, eggs, and vanilla into the chocolate mixture; fold in flour, cocoa powder, and salt just until combined.
Spread the batter evenly in the pan and bake for 18‑20 minutes, until the edges are set but the center still has a slight wobble.
While the brownies cool, whisk Greek yogurt, melted chocolate, maple syrup, and lemon zest until light and airy.
Spread the mousse over the warm brownie layer, smooth the top, then refrigerate for at least 1 hour to set.
Before serving, dust with cocoa powder and cut into squares using a warm knife.
Notes & Tips
-
1
If you prefer a sweeter mousse, add a tablespoon more maple syrup; just remember the brownies already carry a rich chocolate sweetness.
-
2
For a protein boost, you can stir in a scoop of vanilla protein powder into the mousse – it pairs nicely with the protein brownies trend.
-
3
A tiny pinch of sea salt on the finished top elevates the chocolate flavor dramatically.
Tools You'll Need
-
9‑inch square baking pan
-
Parchment paper
-
Heat‑proof mixing bowls
-
Whisk
-
Spatula
-
Sharp knife
Must-Know Tips
-
Keep the mousse chilled; warm mousse can melt the brownie surface.
-
Do not over‑bake; the brownies continue to set as they cool.
-
Allow the cut squares to sit for a minute before moving; they hold their shape better.
Professional Secrets
-
Melt chocolate and butter slowly over a bain‑marie to avoid scorching.
-
Fold the mousse gently using a lifting motion to retain air.
-
Cool the brownie layer slightly before adding mousse; this prevents melting.

Recipe by
Alexa CarterFast food, but smarter 🔥🍽️ Bold flavors, simple steps, and meals that always hit the spot 😎
Get Delicious Recipes Weekly
Join 25,000+ home cooks getting our best recipes straight to their inbox.
Free forever • No spam • Unsubscribe anytime