Cookies and cream as a flavor combination traces back to the 1970s, when chocolate sandwich cookies first debuted and quickly became a pantry staple across America. The indulgent pairing of crushed chocolate cookies with smooth vanilla ice cream evolved into a beloved dessert, celebrated for its easy balance of texture and flavor. This cake pays homage to that legacy, offering a simple yet elegant way to enjoy a classic taste.
Why You'll Love It
-
- No baking required, just chill and serve
-
- Layers of cookie crumb and ice cream create contrast
-
- Perfect for make‑ahead, saves last‑minute stress
-
- Adaptable to gluten‑free or dairy‑free versions
"The cake was a hit at our family gathering—creamy, crisp, and unbelievably easy!"
Essential Ingredient Guide
- Chocolate sandwich cookies: Choose a crisp brand; crush them fine for the base and coarsely for topping.
- Vanilla ice cream: Use a high‑quality, full‑fat ice cream for richness; let it soften slightly before spreading.
- Heavy cream: Whipped lightly, it adds a silky layer between cookie crumbs and ice cream.
- Mini chocolate chips: Stirred in at the end for bursts of chocolate in each bite.
- Lemon zest: A tiny pinch brightens the sweetness without overpowering.
- Honey: Just a drizzle in the whipped cream adds subtle floral notes.

Complete Cooking Process
-
Ingredient Readiness:
Crush the cookies, soften the ice cream, and whip the cream with a touch of honey and zest.
-
Flavor Development:
Layer the cookie crumbs, then spread softened ice cream, letting each layer settle.
-
Texture Control:
Fold mini chocolate chips into the whipped cream for a gentle crunch.
-
Finishing Touches:
Top with a final sprinkle of crushed cookies and a drizzle of honey before chilling.
-
Serving Timing:
Let the cake sit at room temperature for 5‑10 minutes before slicing for perfect cuts.
-
Press the cookie crust firmly to avoid crumbling later
-
Use a rubber spatula to smooth ice cream layers evenly
-
Cover with plastic wrap to prevent ice crystals
-
Freeze at least 4 hours for firm slices
Pro Tips
Well, those little steps make a big difference. I’ve found that the hardest part is just waiting for the cake to set, but the anticipation builds a sweet excitement. When the time comes, the slice holds together beautifully, and the contrast of cool cream and crunchy crumbs feels just right.
The essence of the dish:
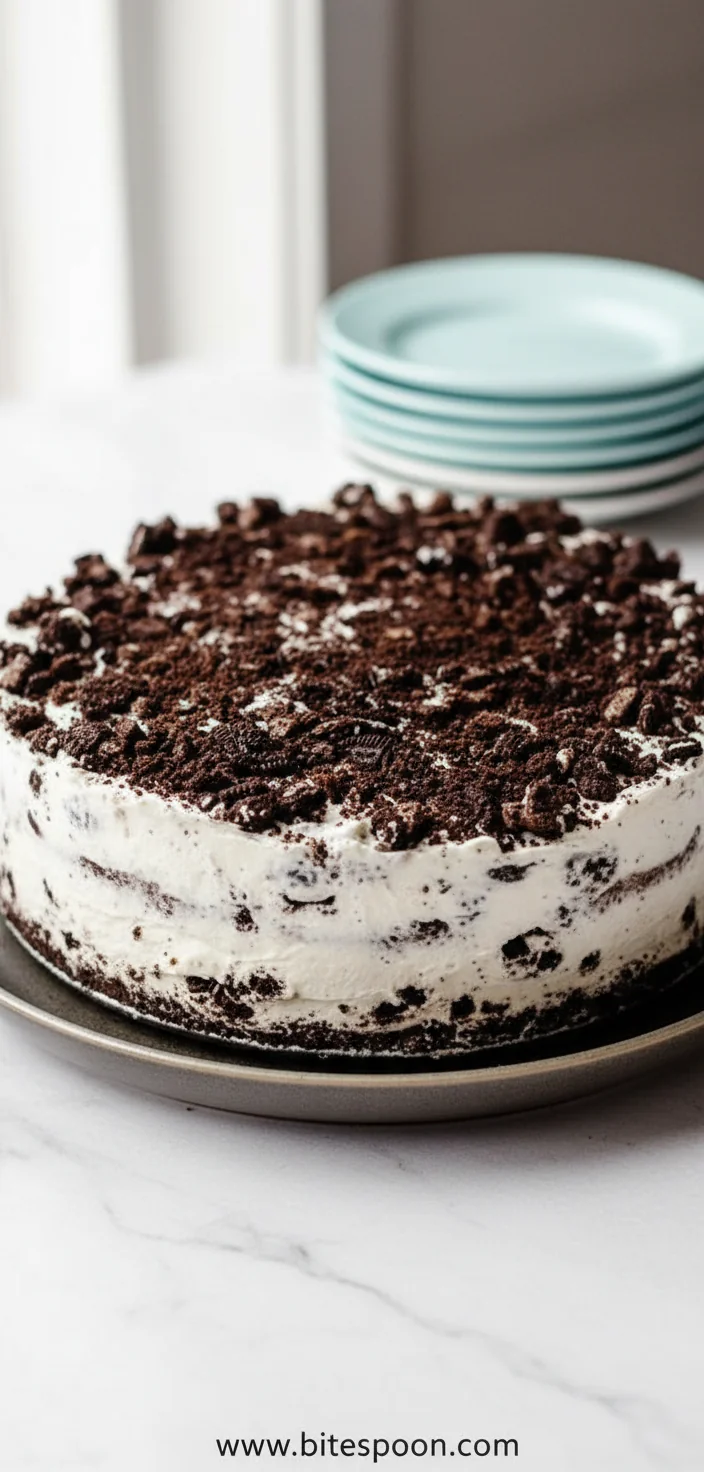
It’s the marriage of crunchy cookie crumbs and luxuriously smooth ice cream, creating a layered texture that melts slowly on the tongue while the cookie base provides a comforting snap.
A fun fact or historical angle:
The original chocolate sandwich cookie was introduced by Nabisco in 1971, quickly becoming a favorite for dessert lovers and inspiring countless twists, including this ice‑cream cake.
Flavor or sensory focus:
Expect the cool, buttery vanilla ice cream to glide over the tongue, punctuated by bursts of chocolate from the cookie crumbles and a whisper of citrus zest.
You Must Know
-
Work quickly once ice cream softens
-
Keep the cake well‑wrapped while freezing
-
Slice with a warm knife for clean cuts
Frequently Asked Questions
→ Can I use a different cookie flavor?
Absolutely, try crushed oatmeal cookies or even a gluten‑free chocolate wafer for a new twist.
→ How long can the cake stay in the freezer?
It keeps well for up to one month, just keep it tightly wrapped to avoid freezer burn.
→ What if I want a dairy‑free version?
Swap the vanilla ice cream for a coconut‑milk based brand and use whipped coconut cream instead of heavy cream.
→ Do I need to thaw before serving?
Let it sit at room temperature for about 5‑10 minutes; this softens the edges for cleaner slices.
→ Can I add fresh fruit?
Yes, a handful of fresh berries between layers adds bright acidity and visual appeal.
→ Is this cake suitable for kids?
Definitely—its mild sweetness and familiar cookie flavor are crowd‑pleasers for all ages.
Nutrition Facts
per serving
420
Calories
5g
Protein
48g
Carbs
22g
Fat
Taste Profile
Creamy sweet with a chocolate crunch
Ingredient Substitutions
Don't have an ingredient? Try these alternatives
Will keep the flavor profile while accommodating gluten restrictions.
Provides a dairy‑free option with a subtle coconut note.
Recipe Variations
Try these delicious twists on the original
Spicy Version
Add a pinch of cayenne and a swirl of chocolate chili sauce for a gentle kick.
Mediterranean Style
Replace chocolate cookies with crushed biscotti and add a layer of orange‑infused whipped cream.
Common Mistakes to Avoid
Learn from others' mistakes for perfect results
- Over‑mixing the whipped cream, causing it to become butter
- Pressing the cookie crust too loosely, leading to cracks
- Leaving the cake uncovered, resulting in ice crystals
Meal Prep & Storage
Make Ahead Tips
You can assemble the crust and ice‑cream layer up to 24 hours ahead; keep covered and frozen until ready to add the whipped cream topping.
Leftover Ideas
Store leftover slices in an airtight container in the freezer; let soften slightly before serving again.
Perfect Pairings
Serve this with...
Cooking Timeline
Crush cookies and mix with melted butter; press into pan.
Spread softened ice cream mixed with chocolate chips over crust.
Whip cream with honey and zest; spread a thin layer.
Add topping of crushed cookies and honey drizzle.
Cover tightly and freeze for at least 4 hours.


Cookies and Cream Ice Cream Cake
A smooth, velvety Cookies and Cream Ice Cream Cake that layers crunchy cookie crumbs with sweet, creamy ice cream. Perfect for birthdays, potlucks, or a quiet night in, this dessert feels like a gentle hug on a warm afternoon.
Timing
Prep Time
20 Minutes
Cook Time
0 Minutes
Total Time
4 Hours 20 Minutes
Recipe Details
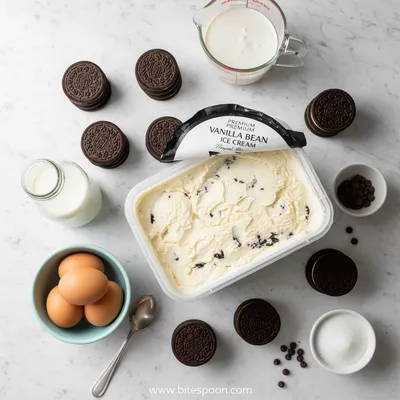
Ingredients
Base
-
01
2 cups chocolate sandwich cookies, finely crushed
-
02
4 tbsp melted butter
Ice Cream Layer
-
01
1½ quarts vanilla ice cream, softened
-
02
½ cup mini chocolate chips
Whipped Cream Layer
-
01
1 cup heavy cream
-
02
2 tbsp honey
-
03
1 tsp lemon zest
Topping
-
01
¼ cup crushed chocolate sandwich cookies
-
02
Drizzle of honey
Instructions
Combine the crushed cookies with melted butter; press firmly into the bottom of a 9‑inch springform pan to form an even crust.
In a mixing bowl, fold softened vanilla ice cream with mini chocolate chips; spread over the crust, smoothing the top with a spatula.
Whip heavy cream with honey and lemon zest until soft peaks form; spread a thin layer over the ice cream.
Sprinkle crushed cookies and a light drizzle of honey on the final layer; cover tightly with plastic wrap.
Freeze for at least 4 hours, preferably overnight, before serving.
Notes & Tips
-
1
If the ice cream begins to melt while mixing, return to freezer briefly.
-
2
Avoid over‑mixing the whipped cream; it should stay light and airy.
-
3
For extra crunch, fold in a handful of chopped cookie pieces into the whipped layer.
Tools You'll Need
-
Springform pan
-
Food processor or zip‑top bag and rolling pin
-
Spatula
-
Mixing bowls
-
Hand mixer
-
Plastic wrap
Must-Know Tips
-
Press the base firmly to prevent cracks later
-
Let ice cream soften just enough to spread easily
-
Cover the cake tightly to avoid ice crystals
Professional Secrets
-
Use room‑temperature ice cream for smoother spreading
-
Chill each layer briefly before adding the next for stability
-
A warm knife slices the frozen cake cleanly

Recipe by
Alexa CarterFast food, but smarter 🔥🍽️ Bold flavors, simple steps, and meals that always hit the spot 😎
Get Delicious Recipes Weekly
Join 25,000+ home cooks getting our best recipes straight to their inbox.
Free forever • No spam • Unsubscribe anytime