
I learned the secret to this soup from my neighbor Margie, who's been cooking for her family for fifty years. She showed me how the cauliflower becomes almost silky when simmered long enough, creating this natural creaminess that feels indulgent without any actual cream. Honestly, I was skeptical at first – could vegetables really transform like that? But wow, the first spoonful convinced me.
There's something magical about watching florets of broccoli and cauliflower soften and surrender to the warmth of the pot. The kitchen fills with this earthy, comforting aroma that makes everyone wander in asking what's for dinner. My son used to turn up his nose at cauliflower, but blended into this soup with its bright green broccoli cousin? He asks for seconds every time.
The best part is how forgiving this soup is. I've made it with frozen vegetables when fresh weren't available, added extra garlic when we were fighting off colds, even thrown in some potatoes when I wanted it thicker. It always comes out comforting and delicious. It's become one of those recipes I make without even thinking, my hands moving through the motions while my mind wanders to other things.
Last winter, when my husband was working late every night, I'd keep a pot of this warming on the stove. He'd come home chilled to the bone, and that first spoonful would just... I mean, you could see the tension leave his shoulders. Food that heals, you know? Not just nourishes, but genuinely makes you feel better about the world.
Why You'll Love It
-
Comfort in a bowl - There's something deeply soothing about this soup's creamy texture and gentle flavors. It's like wrapping yourself in a warm blanket on a chilly day – the way the vegetables break down into this velvety consistency feels both nourishing and indulgent. I love how it fills the kitchen with that comforting vegetable aroma that makes everyone gather around.
-
Quick and easy - Seriously, this comes together faster than you can decide what to watch on TV. From chopping to serving, it's about 30 minutes of active time, most of which is just letting the soup simmer while you set the table. It's perfect for those nights when you're tired but still want something homemade that feels special.
-
Healthy but feels decadent - The magic of this soup is how creamy it gets without any actual cream. The cauliflower creates this luxurious texture that tricks your brain into thinking you're eating something much richer. It's packed with vitamins and fiber but tastes like a treat – my favorite kind of kitchen magic.
-
Perfect for using up vegetables - I can't tell you how many times I've made this with vegetables that were starting to look a little sad in the fridge. Broccoli stems, cauliflower leaves, even a lonely potato – they all find a home here. It's thrifty cooking that tastes anything but.
My family can't get enough of this soup! It's become our favorite weeknight comfort food that even the pickiest eaters love.
Essential Ingredient Guide
- Fresh broccoli: Look for broccoli with tight, deep green florets and firm stalks – that bright color means it's packed with nutrients. I like to use both the florets and the stalks – the stalks add this wonderful creaminess when blended. Just peel off the tough outer layer and chop them up with the rest.
- Cauliflower: Choose a head that feels heavy for its size with creamy white, tightly packed florets. The cauliflower is the secret to the soup's natural creaminess – when simmered and blended, it becomes this silky base that needs no cream. Sometimes I'll roast a few florets separately for garnish, which adds this lovely nutty flavor.
- Vegetable broth: A good quality broth makes all the difference here. I usually make my own when I have vegetable scraps, but a good store-bought organic one works beautifully too. The broth carries all the flavors and helps the vegetables break down into that perfect soup consistency.

Complete Cooking Process
-
Preparation:
First, I gather all my vegetables – there's something meditative about washing the broccoli and cauliflower, watching the water run over their intricate shapes. I chop everything into similar-sized pieces so they cook evenly, and the kitchen starts to smell so fresh and green. The onion gets diced finely – I love that moment when the knife glides through the layers, releasing that sharp scent that promises flavor.
Next, I measure out the broth and get my seasonings ready. Having everything prepped makes the actual cooking feel so smooth, like a dance where you know all the steps. I'll sometimes put on some soft music and just enjoy the rhythm of chopping and measuring – it's my favorite kind of kitchen therapy.
-
Cooking:
I start by sautéing the onion and garlic until they're soft and fragrant – that sizzle when they hit the warm oil is one of my favorite kitchen sounds. Then in go the broccoli and cauliflower, and I love watching them soak up all those flavors as I stir. The vegetables start to soften and release their own sweet aromas, mingling with the onion in the most comforting way.
Once everything is nicely coated and starting to soften, I pour in the broth. The steam rises up, carrying all those beautiful smells straight to my nose. I bring it to a gentle simmer and let it bubble away quietly while I tidy up – there's something so peaceful about a pot quietly cooking on the stove.
-
Blending and Finishing:
After about 20 minutes, when the vegetables are tender enough to crush with a spoon, it's blending time. I use my immersion blender right in the pot – careful of the hot splatters! – and watch as the chunky vegetables transform into this smooth, creamy emulsion. It's like magic every single time.
Then comes the final seasoning. A pinch more salt, maybe some black pepper, and a squeeze of lemon juice to brighten everything up. I'll taste it and adjust until it's just right – that moment when all the flavors come together in perfect harmony. Sometimes I'll stir in a little cream or coconut milk for extra richness, but honestly, it's wonderful just as is.
-
Don't rush the sauté – letting the onions soften properly builds a great flavor foundation
-
Cut vegetables evenly – this ensures everything cooks at the same rate for perfect texture
-
Taste before blending – adjust seasonings when you can still see what you're working with
-
Blend in batches if using a regular blender – and be careful with the hot liquid!
Pro Tips
Remember, soup is forgiving – you can always add more liquid if it's too thick, or simmer longer if it's too thin. Trust your instincts – you've got this.


The Comfort of Simple Ingredients
What I love most about this soup is how it transforms humble vegetables into something truly special. Broccoli and cauliflower – we see them all the time in the grocery store, maybe even take them for granted sometimes. But when you simmer them together with just a few other simple ingredients, they create this beautiful harmony that feels both nourishing and comforting.
It reminds me of the kind of cooking my grandmother did – using what was available, making it delicious through patience and care rather than complicated techniques. This soup would pair beautifully with a slice of zucchini cheddar bread for a complete meal that feels like home.
You Must Know
-
The soup thickens as it cools – don't worry if it seems thin at first
-
Fresh vegetables work best for the brightest flavor
-
You can freeze this soup beautifully for up to 3 months
-
The color will darken slightly overnight – that's perfectly normal
Frequently Asked Questions
→ Can I use frozen vegetables instead of fresh?
Absolutely, frozen vegetables work just fine here. Actually, they're a great option when fresh isn't available or when you're in a real hurry. The texture might be slightly softer, but the flavor will still be wonderful. I'd recommend thawing them first and patting dry to avoid watering down the soup. Just adjust the cooking time since frozen vegetables will cook faster than fresh.
→ How do I make the soup extra creamy?
The cauliflower naturally creates a creamy texture, but if you want it even richer, you can add a splash of cream, coconut milk, or even a peeled potato while cooking. The potato will break down and thicken the soup beautifully. Another trick is to blend in a tablespoon of butter or olive oil at the end – it adds richness and helps emulsify everything.
→ Can I add other vegetables to this soup?
Definitely! This soup is very forgiving. I've added carrots, potatoes, even some spinach at the end. If you're adding harder vegetables like carrots or potatoes, chop them small and add them with the broccoli and cauliflower. For softer vegetables like spinach or zucchini, add them in the last 5 minutes of cooking. It's a great way to use up whatever you have on hand.
→ How long does this soup keep in the refrigerator?
It will keep beautifully for 3-4 days in an airtight container. The flavor actually improves after a day as everything melds together. When reheating, you might need to add a splash of water or broth since it thickens as it sits. Give it a good stir while reheating to bring back that creamy consistency.
→ Can I make this soup vegan?
Yes, it's naturally vegan if you use vegetable broth! The creaminess comes from the blended cauliflower, so you don't need any dairy at all. I sometimes finish it with a drizzle of good olive oil instead of butter for that extra richness. It's one of those recipes that proves plant-based eating can be incredibly satisfying and comforting.
→ What's the best way to blend the soup?
An immersion blender is my favorite because you can blend right in the pot – fewer dishes to wash! If using a regular blender, please be very careful with the hot liquid. Blend in small batches, don't fill the blender more than halfway, and hold the lid down with a towel. Hot soup can create steam pressure that blows the lid off – safety first!
→ Can I freeze this broccoli cauliflower soup?
You absolutely can, and it freezes wonderfully for up to 3 months. Let it cool completely first, then portion it into freezer-safe containers, leaving some space at the top for expansion. When reheating, thaw overnight in the refrigerator first, then gently reheat on the stove. The texture might separate a bit after freezing – just give it a good whisk or quick blend to bring it back together.
→ What should I serve with this soup?
This soup is lovely with crusty bread for dipping, or you could try it with zucchini noodles on the side for a lighter meal. A simple green salad or some zucchini bread makes a nice accompaniment too. Honestly, it's satisfying enough to enjoy on its own as well.
Nutrition Facts
per serving
120
Calories
5g
Protein
18g
Carbs
4g
Fat
Taste Profile
A balanced, comforting flavor with earthy vegetable notes and a bright finish
Ingredient Substitutions
Don't have an ingredient? Try these alternatives
Chicken broth adds richness, water works in a pinch but will be less flavorful
Thaw and pat dry first to avoid watering down the soup
Butter adds richness, avocado oil has a neutral flavor
Recipe Variations
Try these delicious twists on the original
Cheesy Version
Stir in a cup of shredded cheddar or Parmesan after blending for a rich, cheesy flavor
Spicy Version
Add a pinch of red pepper flakes with the garlic, or swirl in some hot sauce at the end
Creamy Coconut Version
Use coconut milk instead of some broth for a tropical twist
Common Mistakes to Avoid
Learn from others' mistakes for perfect results
- Overcooking the garlic – it turns bitter if burned
- Not blending thoroughly – leaves unpleasant chunks
- Underseasoning – vegetables need enough salt to shine
- Adding dairy too early – can cause curdling if boiled
Meal Prep & Storage
Make Ahead Tips
You can chop the vegetables up to 2 days ahead and store them in airtight containers in the refrigerator. The soup itself actually tastes better the next day, so making it ahead is a great idea. It reheats beautifully and the flavors have more time to develop and meld together.
Leftover Ideas
Leftover soup makes a wonderful sauce for pasta or grains – just thin it slightly with broth. You can also use it as a base for other dishes – try adding cooked chicken or beans for a heartier meal. It's even delicious cold the next day, though I prefer it warmed.
Perfect Pairings
Serve this with...
Cooking Timeline
Prep all vegetables – chop broccoli, cauliflower, onion, mince garlic
Sauté onion and garlic, then add vegetables to soften
Add broth and seasonings, simmer until vegetables are tender
Blend soup, adjust seasonings, and serve


Creamy Broccoli Cauliflower Soup Recipe
A comforting broccoli cauliflower soup perfect for cozy nights.
Timing
Prep Time
15 Minutes
Cook Time
25 Minutes
Total Time
40 Minutes
Recipe Details
Ingredients
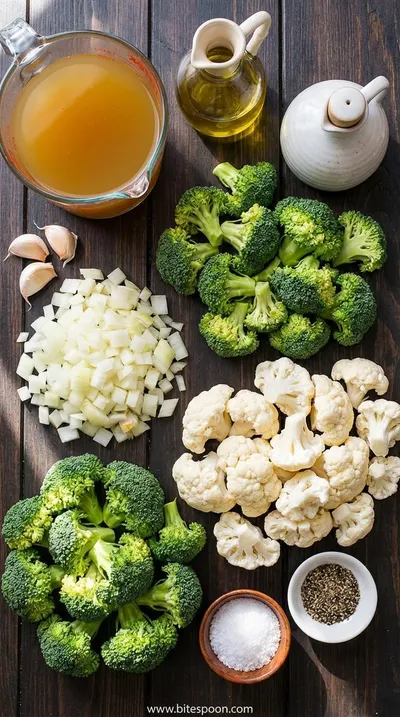
Main Vegetables
-
01
1 large head broccoli, chopped into florets (about 4 cups)
-
02
1 medium cauliflower, chopped into florets (about 4 cups)
-
03
1 yellow onion, diced
-
04
3 cloves garlic, minced
Liquid and Seasonings
-
01
4 cups vegetable broth
-
02
2 tablespoons olive oil
-
03
1 teaspoon salt
-
04
½ teaspoon black pepper
-
05
½ teaspoon dried thyme
-
06
Juice of ½ lemon
Instructions
Start by prepping all your vegetables. Wash the broccoli and cauliflower thoroughly, then chop them into similar-sized florets so they cook evenly. Dice the onion finely – I love how the layers separate under the knife. Mince the garlic, enjoying that sharp, aromatic scent that fills the air. Having everything ready makes the cooking process feel so smooth and relaxing.
Heat the olive oil in a large pot over medium heat. Add the diced onion and sauté until it becomes soft and translucent, about 5 minutes. The kitchen will start smelling amazing as the onion releases its sweet aroma. Then add the minced garlic and cook for just another minute until fragrant – be careful not to burn it, as burnt garlic can turn bitter.
Add the chopped broccoli and cauliflower to the pot. Stir everything together so the vegetables get coated with the onion and garlic mixture. Cook for about 5 minutes, stirring occasionally, until the vegetables start to soften slightly and their colors become more vibrant. This step helps develop deeper flavor in the final soup.
Pour in the vegetable broth and add the salt, pepper, and thyme. Bring everything to a gentle boil, then reduce the heat to a simmer. Cover the pot and let it cook for 15-20 minutes, until the vegetables are very tender when pierced with a fork. The broth will have taken on all those beautiful vegetable flavors.
Carefully blend the soup until smooth using an immersion blender. If using a regular blender, work in batches and be very cautious with the hot liquid. Blend until you achieve your desired consistency – I like it perfectly smooth, but you can leave it a bit chunky if you prefer. The transformation from chunky vegetables to creamy soup is always magical to watch.
Stir in the lemon juice and taste for seasoning. Adjust salt and pepper if needed. If the soup is too thick, you can add a little more broth or water until it reaches your preferred consistency. Let it heat through for another minute, then serve hot. I love garnishing with an extra drizzle of olive oil or some fresh herbs.
Notes & Tips
-
1
The soup will thicken as it cools, so don't worry if it seems a bit thin initially – it will perfect itself as it sits
-
2
If you want an extra flavor boost, you can roast the cauliflower first – it brings out a wonderful nuttiness
-
3
This soup freezes beautifully for up to 3 months – perfect for quick meals on busy nights
-
4
For a creamier version without dairy, blend in a tablespoon of tahini or a small avocado
-
5
Leftovers make a great sauce over pasta or grains – just thin it out slightly with broth or water

Tools You'll Need
-
Large soup pot with lid – something sturdy that distributes heat evenly
-
Immersion blender or regular blender – the immersion blender is so convenient for fewer dishes
-
Cutting board and sharp knife – for prepping all those beautiful vegetables
-
Measuring cups and spoons – for getting the proportions just right
-
Wooden spoon or spatula – for stirring without scratching your pot
-
Ladle – for serving the soup into bowls beautifully
Must-Know Tips
-
Don't overcrowd the pot - Give the vegetables space to soften properly
-
Taste as you go - Seasoning is key for bringing out the vegetable flavors
-
Blend carefully - Hot soup can be dangerous in a blender – safety first!
Professional Secrets
-
Sauté vegetables first - This step builds flavor depth before adding liquid
-
Use homemade broth - It makes a noticeable difference in the final result
-
Finish with acid - The lemon juice brightens all the flavors beautifully

Recipe by
Alexa CarterFast food, but smarter 🔥🍽️ Bold flavors, simple steps, and meals that always hit the spot 😎
Get Delicious Recipes Weekly
Join 25,000+ home cooks getting our best recipes straight to their inbox.
Free forever • No spam • Unsubscribe anytime