Vanilla ice cream has traveled from the royal courts of 17th‑century France to modern freezers worldwide. Its simple blend of dairy, sugar, and vanilla bean became a symbol of indulgence that crossed class lines, turning a luxury into a beloved everyday treat. Today, the no‑cook method whispers that tradition can be both effortless and elegant, proving that flavor doesn’t need fire to flourish.
Why You'll Love It
-
- No stove needed, perfect for hot days
-
- Simple pantry staples, minimal prep
-
- Creamy mouthfeel that rivals churned ice cream
-
- Adjustable sweetness and flavor intensity
"The texture was luxuriously smooth, and I didn’t even have to use an ice cream maker!"
Essential Ingredient Guide
- Heavy cream: Choose a cream with at least 35% fat for richness; it carries the vanilla flavor beautifully.
- Whole milk: Whole milk balances the richness of cream and helps the mixture freeze smoothly.
- Granulated sugar: Dissolves fully when whisked; you can adjust for a subtler sweetness.
- Pure vanilla extract: A high‑quality extract provides depth; a split vanilla bean works even better.
- Pinch of salt: Enhances the vanilla aroma and rounds out the sweetness.
- Optional: a splash of almond milk: Adds a nutty nuance without altering the classic flavor.
Complete Cooking Process
-
Ingredient Readiness:
Measure and whisk together cream, milk, sugar, and salt until the sugar disappears.
-
Flavor Development:
Stir in the vanilla extract and let the mixture rest for a few minutes to awaken the aroma.
-
Texture Control:
Pour the base into a shallow pan, cover, and place in the freezer, stirring every 30 minutes to break ice crystals.
-
Finishing Touches:
After 2–3 hours, the ice cream is soft‑serve ready; let it sit a little longer for a firmer scoop.
-
Serving Timing:
Serve within a day for best texture; it softens quickly at room temperature.
-
Use a metal mixing bowl; it stays colder longer.
-
Whisk the sugar into the milk first to dissolve faster.
-
Stir with a spatula, not a whisk, when in the freezer for smoother texture.
-
Add a tiny splash of vodka (optional) to lower freezing point – but we skip alcohol here.
Pro Tips
I always let the mixture sit for a minute after each stir; it gives me a moment to feel the coolness and hear the faint clink of the spoon. That pause feels like a quiet promise that the final scoop will be just right. So, take your time, breathe in the vanilla scent, and enjoy the gentle rhythm of the freezer work.
The essence of the dish:
It’s the pure, mellow scent of vanilla cradled in a buttery, cream‑laden base, offering a sweet, simple pleasure that feels familiar yet fresh.
A fun fact or historical angle:
Did you know the first vanilla ice cream recipes required hand‑cranking in insulated tubs? Today’s no‑cook method lets you skip the labor while preserving that classic charm.
Flavor or sensory focus:
Expect a silky texture that melts on the tongue, with aromatic vanilla notes that linger like a soft whisper of summer.
You Must Know
-
Keep everything extra‑cold before mixing
-
Stir regularly to avoid icy crystals
-
Serve immediately for the best mouthfeel
Frequently Asked Questions
→ Can I use a plant‑based milk?
Yes, substitute almond or oat milk for the whole milk; the texture will be slightly lighter but still creamy.
→ Do I need an ice cream maker?
No, the freezer‑stir method works well, just be patient with the occasional stirring.
→ How long can leftovers be stored?
Keep the ice cream sealed in an airtight container for up to 5 days; stir before serving to restore smoothness.
→ What if the ice cream is too icy?
Make sure the stirring intervals are frequent enough; adding a splash of vodka (optional) can help, but you can also increase the cream ratio.
→ Can I add mix‑ins like chocolate chips?
Add any mix‑ins during the final stirring stage, after the base is semi‑set.
→ Is this recipe suitable for keto?
Swap the granulated sugar for a keto‑friendly sweetener and keep the carb count low.
Nutrition Facts
per serving
310
Calories
4g
Protein
26g
Carbs
22g
Fat
Taste Profile
A gentle, creamy sweetness highlighted by vanilla
Ingredient Substitutions
Don't have an ingredient? Try these alternatives
Will add a slight coconut aroma; keep the freezer time similar.
Honey adds a subtle floral note; adjust quantity to taste.
Recipe Variations
Try these delicious twists on the original
Dairy‑Free Version
Swap heavy cream and milk for coconut milk and coconut cream for a tropical twist.
Fruit Swirl
Fold in a raspberry puree after the final stir for a vibrant ribbon of flavor.
Common Mistakes to Avoid
Learn from others' mistakes for perfect results
- Leaving the mixture untouched for too long, causing large ice crystals.
- Using warm ingredients; they slow the freezing process.
- Stirring with a metal whisk that creates too much air, leading to a fluffy texture instead of creamy.
Meal Prep & Storage
Make Ahead Tips
You can prepare the base mixture up to 24 hours ahead; keep it refrigerated and give it a good stir before freezing.
Leftover Ideas
Re‑stir a frozen scoop gently in a warm bowl to restore creaminess before serving.
Perfect Pairings
Serve this with...
Cooking Timeline
Gather and whisk together all base ingredients until smooth.
Add vanilla, let the mixture rest, then cover.
Place in freezer; stir every 30 minutes to break ice crystals.
After the final stir, let it firm for another 30 minutes before scooping.

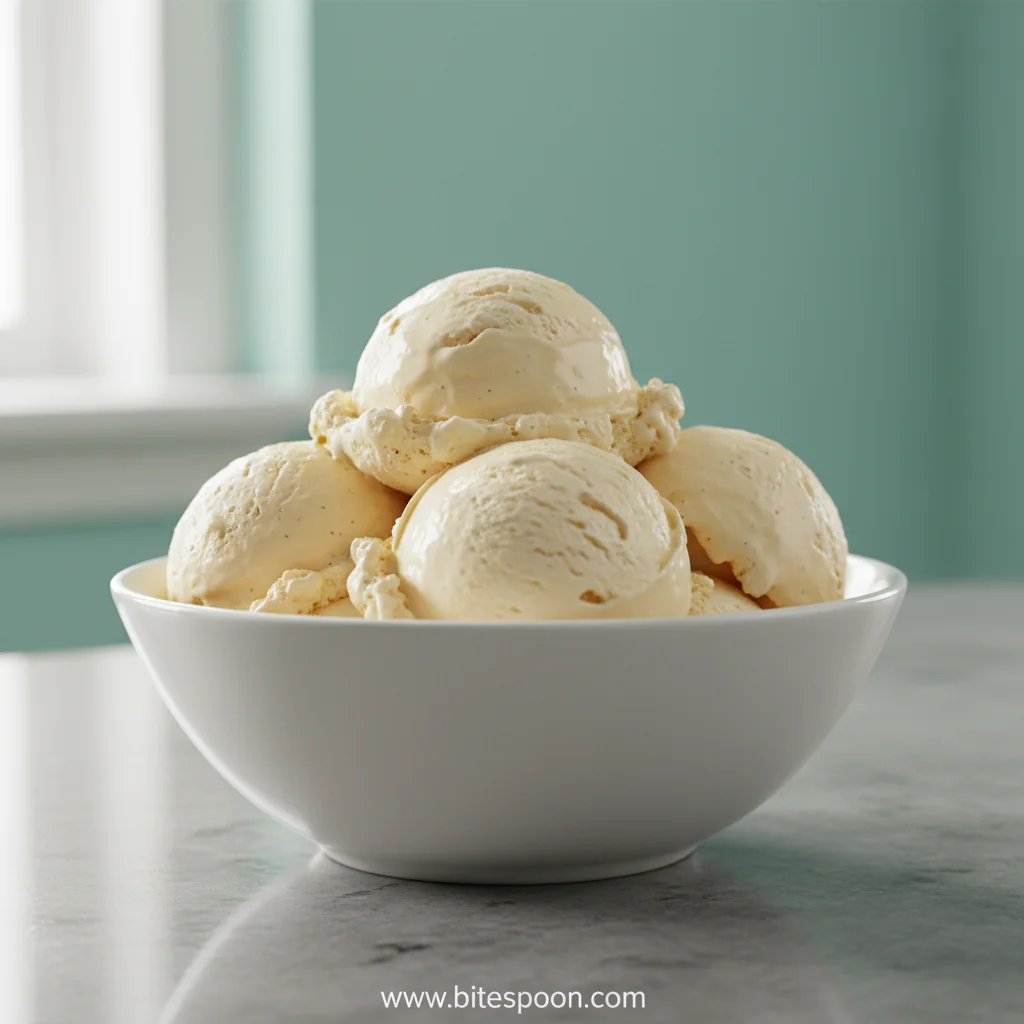
Homemade Vanilla Ice Cream – No‑Cook Recipe
Whip up a silky, dreamy scoop of vanilla ice cream without ever lighting a stove – a gentle, no‑cook treat that feels like summer on a cool evening.
Timing
Prep Time
15 Minutes
Cook Time
0 Minutes
Total Time
2 Hours 30 Minutes
Recipe Details
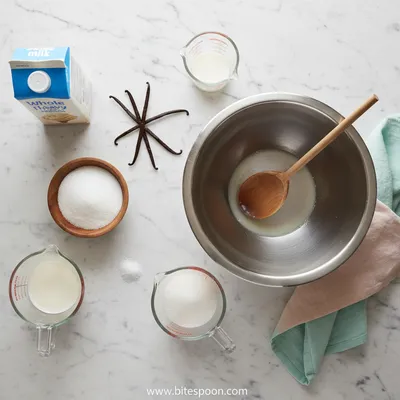
Ingredients
Base
-
01
2 cups heavy cream
-
02
1 cup whole milk
-
03
1/2 cup granulated sugar
-
04
1 pinch of salt
Flavoring
-
01
2 teaspoons pure vanilla extract
-
02
Optional: 2 tbsp almond milk for a subtle nutty note
Instructions
In a large bowl, whisk together the heavy cream, whole milk, sugar, and salt until the sugar dissolves completely.
Stir in the vanilla extract (and almond milk if using); let the mixture sit for 5 minutes so the vanilla fragrance can bloom.
Cover the bowl tightly and place it in the freezer. After 30 minutes, remove and stir vigorously with a spatula to break up any forming ice crystals.
Repeat the stirring every 30 minutes for 2‑3 hours, or until the ice cream reaches a soft‑serve consistency.
Transfer the final texture to a lidded container and let it firm for another 30 minutes before scooping.
Notes & Tips
-
1
For a richer mouthfeel, use 2 ¾ cups of cream and reduce milk to ¾ cup.
-
2
If you prefer a slightly sweeter ice cream, add an extra tablespoon of sugar before freezing.
-
3
A pinch of extra vanilla beans (scraped) can deepen the aroma for a more intense flavor.
Tools You'll Need
-
Large mixing bowl
-
Whisk
-
Spatula
-
Freezer‑safe container
-
Measuring cups and spoons
Must-Know Tips
-
Keep all ingredients chilled before mixing; it speeds up the freezing process.
-
Stir with a spatula, not a whisk, during freezing to create a smoother texture.
-
Cover tightly to prevent ice crystals from forming on the surface.
Professional Secrets
-
Use a metal bowl; it stays colder longer, helping the mixture freeze faster.
-
Whisk the sugar into the milk first; it dissolves more efficiently.
-
Stir in short, vigorous bursts to incorporate air for a lighter scoop.

Recipe by
Alexa CarterFast food, but smarter 🔥🍽️ Bold flavors, simple steps, and meals that always hit the spot 😎
Get Delicious Recipes Weekly
Join 25,000+ home cooks getting our best recipes straight to their inbox.
Free forever • No spam • Unsubscribe anytime