
In the mid‑1960s, ice cream trucks began offering simple sandwich treats that quickly became a staple of summer picnics. Over time, home cooks started layering those sandwiches into larger forms, turning a handheld snack into a celebratory cake. This evolution reflects the playful spirit of American dessert culture, where convenience meets indulgence, and the result is a centerpiece that captures the nostalgia of sunny afternoons.
Why You'll Love It
-
- No oven needed, perfect for hot days
-
- Simple ingredients you probably already have
-
- Customizable with any flavor of ice cream
-
- Fun to assemble with kids or friends
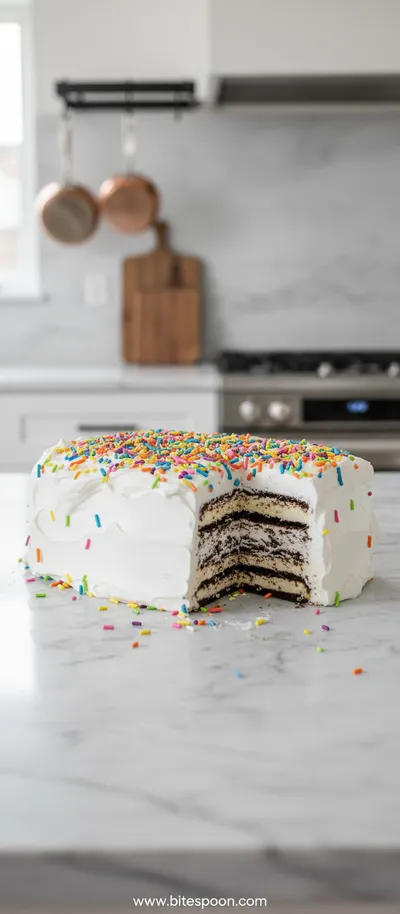
Wow, this cake turned heads at my birthday party – everyone loved the creamy layers!
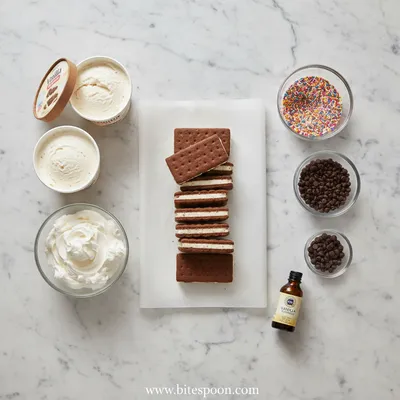
Essential Ingredient Guide
- Soft sandwich cookies: Choose a buttery, slightly crisp cookie; it provides the foundation and absorbs a little ice cream for texture.
- Premium vanilla ice cream: A high‑fat ice cream gives a rich mouthfeel and holds the structure when frozen together.
- Whipped cream topping: Adds a light, airy contrast to the dense layers, and looks elegant when piped.
- Chocolate ganache: Drizzles in a glossy finish and deepens the flavor with a slight bitterness.
- Fresh berries: A splash of acidity brightens the sweetness and adds a pop of color.
- Sprinkles or crushed nuts: Optional textural surprise that adds crunch and visual fun.
Complete Cooking Process
-
Ingredient Readiness:
Let the ice cream soften just enough to spread, and line a springform pan with parchment for easy removal.
-
Flavor Development:
Layer cookies and ice cream, allowing the cookies to soften and take on the cream’s flavor.
-
Texture Control:
Press each layer gently; too much pressure can crush the cookies, too little leaves gaps.
-
Finishing Touches:
Top with whipped cream, drizzle ganache, and garnish with berries before freezing.
-
Serving Timing:
Allow the cake to sit at room temperature for 5‑10 minutes before slicing to avoid cracking.
-
Freeze the assembled cake for at least 2 hours for clean slices
-
Use an offset spatula to smooth the top for a professional look
-
Swap vanilla ice cream with mint‑chocolate for a refreshing twist
-
Add a thin layer of melted chocolate between layers for extra richness
Pro Tips
These little adjustments turn a simple assembly into a show‑stopping dessert. I remember the first time I tried the chocolate‑layered version – the scent of cocoa filled the kitchen, and the guests were instantly drawn to the glossy surface. Take a moment to let the cake rest after pulling it from the freezer; the flavors settle, and each bite feels perfectly balanced.
The essence of the dish:
It’s about contrast – the crunchy cookie meets the cold, silky ice cream, all bound together by a creamy frosting that whispers of summer evenings.
A fun fact or historical angle:
The concept of turning ice cream sandwiches into a larger cake predates the internet, emerging from community potlucks where leftovers were repurposed into crowd‑pleasing desserts.
Flavor or sensory focus:
First, you’ll notice the gentle vanilla aroma, then the buttery snap of the cookie, followed by the cool, velvety melt of the ice cream – a dance of temperature and texture.
You Must Know
-
Work quickly once the ice cream softens
-
Keep the pan chilled if the kitchen is warm
-
Seal the edges with a thin layer of ganache
Frequently Asked Questions
→ Can I use gluten‑free cookies?
Absolutely – choose a sturdy gluten‑free sandwich cookie and follow the same layering method.
→ How long can the cake stay frozen?
It keeps well for up to two weeks in an airtight container; just let it soften slightly before serving.
→ Can I make a dairy‑free version?
Yes, swap the dairy ice cream for a coconut‑milk or almond‑milk based ice cream and use a vegan whipped topping.
→ Do I need to thaw the cake before cutting?
A brief 5‑10 minute rest at room temperature makes slicing easier and prevents crumbling.
→ What toppings work best?
Fresh berries, toasted nuts, or a drizzle of chocolate or caramel all add texture and visual appeal.
→ Can I add a layer of fruit preserves?
Sure – a thin spread of strawberry or raspberry jam adds a pleasant tart contrast.
Nutrition Facts
per serving
410
Calories
5g
Protein
45g
Carbs
22g
Fat
Taste Profile
Richly sweet with a buttery backdrop
Ingredient Substitutions
Don't have an ingredient? Try these alternatives
Adds a deeper caramel note; reduce any added sugar.
Creates a sweeter contrast; may need less berries.
Recipe Variations
Try these delicious twists on the original
Spicy Version
Add a pinch of cayenne and drizzle with chocolate‑chili ganache for a subtle kick.
Mediterranean Style
Use pistachio‑flavored ice cream, garnish with orange zest and toasted almond slivers.
Common Mistakes to Avoid
Learn from others' mistakes for perfect results
- Over‑pressing cookies causing them to turn mushy
- Allowing ice cream to melt too much before layering
- Skipping the final freeze, resulting in a sloppy slice
Meal Prep & Storage
Make Ahead Tips
Assemble the cake up to the frosting step and freeze; add whipped topping and garnish just before serving.
Leftover Ideas
Slice remaining pieces and store in the freezer; re‑slice after a brief thaw for best texture.
Perfect Pairings
Serve this with...
Cooking Timeline
Line pan, soften ice cream, and gather all ingredients.
Layer cookies and ice cream, pressing gently each time.
Freeze assembled layers for at least 2 hours.
Whip cream, spread over cake, drizzle ganache, add berries and nuts.
Final freeze, then slice and serve.
Ice Cream Sandwich Cake – Easy No‑Bake Dessert
Discover how to make a quick and creamy Ice Cream Sandwich Cake, a fun no‑bake dessert perfect for any gathering.
Timing
Prep Time
15 Minutes
Cook Time
0 Minutes
Total Time
2 Hours 15 Minutes
Recipe Details
Ingredients
Base and Layers
-
01
24 soft sandwich cookies (about 2 oz each)
-
02
1 quart premium vanilla ice cream, softened
-
03
1 cup whipped topping
Frosting and Garnish
-
01
1/2 cup heavy cream
-
02
2 tbsp powdered sugar
-
03
4 tbsp dark chocolate ganache
-
04
1 cup fresh mixed berries
-
05
2 tbsp toasted chopped pecans
Instructions
Line a 9‑inch springform pan with parchment; set aside.
Spread a thin layer of softened ice cream on the bottom, then place a single row of cookies, pressing gently.
Repeat layering – ice cream, cookies – until you reach the top, ending with a solid ice‑cream layer.
Cover the pan with plastic wrap and freeze for at least 2 hours.
Whip the heavy cream with powdered sugar until soft peaks form; spread over the frozen cake.
Drizzle chocolate ganache, scatter berries and toasted pecans, then return to freezer for 15 minutes.
Release the springform, slice with a warm knife, and serve immediately.
Notes & Tips
-
1
Work quickly once the ice cream softens to avoid melting.
-
2
If the kitchen is warm, chill the pan in the freezer for 10 minutes before assembling.
-
3
Feel free to swap vanilla ice cream for almond‑milk ice cream for a dairy‑free twist.
Tools You'll Need
-
9‑inch springform pan
-
Parchment paper
-
Spatula
-
Electric mixer
-
Sharp knife for slicing
-
Freezer space
Must-Know Tips
-
Don’t over‑press the cookies, they need a little air for texture
-
Let the cake rest briefly before slicing to avoid cracking
-
Taste the ice cream before adding extra sweeteners
Professional Secrets
-
Use ice cream at just the right softness – too hard, it won’t spread; too soft, it will become soupy
-
A thin ganache layer acts as a seal, keeping moisture in
-
Freezing the assembled cake solidifies the cookie‑ice cream bond

Recipe by
Mia CollinsSmall bites, big happiness 😋✨ Fun snacks, tasty treats, and flavor in every bite 🧆
Get Delicious Recipes Weekly
Join 25,000+ home cooks getting our best recipes straight to their inbox.
Free forever • No spam • Unsubscribe anytime